Cameras I don't like to work On
 Rolleiflex T is a reasonably good camera when compared to a Rolleicord, or Yashicamat, however, it is a solid step below the Automat, and not even comparable to a Letter model. These cameras were cheapened consumer products that were meant to be discarded when worn. Now they have the Rolleiflex name on them, and people pay well into the 400 dollar range, which is about four times what they are worth. So, when it comes to fixing them, I have to take several hours and charge 120-150 dollars for a camera that will have a useful life of maybe a few more years, and that I cannot warranty for more than a few months. In short the insides are not up to Rollei standards, they have plastic parts and you the photographer should get an Automat instead; save money, and have a lifetime camera.
Rolleimajic, every example has a bad meter, and will not function. This is also the only Rollei product in 50 plus years and upwards of 7,000,000 cameras that uses a Prontor shutter. These are collectable's only.
Yashica cameras can be very high in functionality however, they are prone to wear, and I cannot warrant them, so I will not work on them. I have opened the film advance to find metal parts that were made from Heidelberg Beer cans...Does that sound like a quality camera to you? At times, I can be talked into working on the early TLR, such as the A, C, or D. But please ask me before sending the camera--I have to be in the mood to work on them.
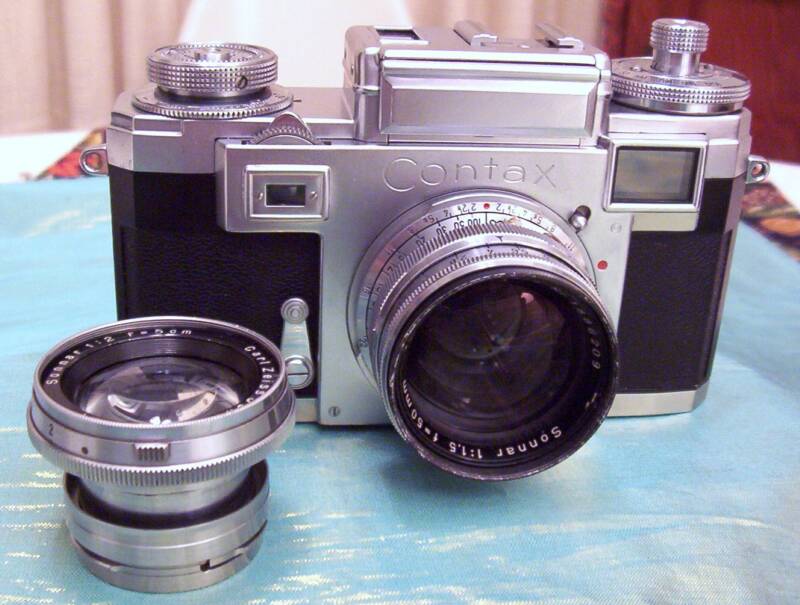
The Finest Camera Ever Made--CONTAX IIa/IIIa
I know all you Leica M fans will not agree but in terms of built quality, no other camera can come close to the Contax IIa/IIIa. Here is why:
1) All metal parts that touch each other, except the curtain, are chrome plated, for better wear resistance, and to prevent corrosion.
2) The only plastic parts in the camera are on the flash synch insulators, and on the meter window, the entire rest of the camera is metal.
3) The camera is flash synched from 1/50, and every speed slower, not just the 1/25 speed like the Leica.
4) Metal shutter curtain. Never worry about burning the curtain on a sunset photo again.
6) The Range finder is a longer base, and can actually coordinate with the longest lenses made for the camera, in the 250mm-300mm range.
7) The shoe is actually centered over the lens, so parallax is only in the vertical.
8) The Range finder spot is brighter and contrasts better, making it more useful in low light.
9) For lenses of focal lengths of 50mm or less can use the finger focus wheel. This is the fastest way to focus any range finder camera.
10) Good reliable self timer.
11) Superior fit and finish for all parts, including the leather covering, and all chrome plated covers.
12) Removable back making it super easy to load.
So, considering all the above, and that the lenses are about half the price, and just as sharp as any Leica lens, why would you want the Wetzlar product? Contax was and will always be the best camera ever made. And I know because I have taken all of them apart, and none can compare.
Bellows Problems :
For just about any folding camera the bellows is what limits the life of the camera. In some cases, and where properly taken care of, the bellows will last for years, and not give a lick of trouble. These bellows tend to be those made of leather, backed with card stock and then a layer of shutter curtain material. This is what the finer camera makers used, such as those form Zeiss Ikon, Voigtlander, Welta... However, some manufacturers cut corners by using a cloth backed vinyl product, that was cheaper to make, and therefore reduced the cost of the camera to the end user. This material is virtually always bad, and will require replacement, if possible or in the minimum a costly repair. The companies that used this type of material are: Agfa, Ansco, Kodak, Graflex (surprisingly these tend to last). I am regularly send cameras from Agfa, with good shutters, lenses and film transports, but the bellows are full of holes and so the camera is useless. This is really a shame, for both the customer, and myself, since we both loose money and really have no way to recover any of our investment.
So, before you buy a folding camera, take bright flash light, and shine it into the bellows and see if any pin holes appear. At the current time I have no new bellows, and I can forsee no new source. So if the bellows is bad, the camera becomes a paper weight.
Aftermarket Bright-Focus Screens:
I get many repuests for installing aftermarket bright focus screens, into Rolleiflex, and Rolleicord caemras, so here is my take on them.
I am a purest. In my perfect world, all caemras would be exactly as they left the factory. To this end... I believe that the engineers at the cameras manufacturer, put a lot of time and effort into figuring out what they wanted the camera to do, and designed it accordingly. Those engineers had specific standards, and they tested and measured the cameras performance to those standards. Rolleiflex did not put a Fresnel screen into a camera until the model E2, in the late 1950s, and then they continued the practice with TLRs until the end of the company in 1980. The problems with the ground glass is that it is a bit dark round the edges. The problem with the Fresnel is that it is hard to get a good crisp image while looking at the grooves, of the fresnel, and that the soft plastic is not very durable when being cleaned, and scratches easily, making focusing and composition even more difficult. So, brightness is enhanced but durability, and image quaily are degraded.
Now let's move ahead 50 years to today. There are at least three different makers of aftermarket bright screens available for Rolleiflex cameras, and probably 25 different models of screens from these three makers. Some have split image focus aids, some have a bright spot for focus, there are grids on the ground side, and some just have cross hairs. For all their features, not one aftermarket screen has been designed by team of Opitcal Engineers. This leaves me the camera tech to try and make them work.
The problems with most aftermaret screens are thus: Is the focal length the same as the lens on the camera you are using. f:3.5 Rolleiflex cameras have 7.5cm lenses, and f:2.8 cameras have 8cm lenses. This may seem trivial, but it is not. No camera equipped with a 7.5cm viewer lens will ever properly focus with an 8cm focal length bright screen. I find this over and over, with camera sent to me, that have Yashica Fresnels fitted under the ground glass. This latter example is the worst case, an 8cm Fresnel below (closer) to the 7.5cm lens; which makes it never focus at infinity, and is way off up close.
So lets assume the focal length is correct for your camera. Now the next problem is how many segemts the Fresnel has. The more segments, the brighter the screen is. The more segments the Fresnel has the More distorted the images is. So, the manufacture has to pick what they want, a very bright image, or a very distorted image. So, now most aftermarket screens have gone for maximum brightness, but they leave the image badly distorted. One of the most popual aftermarket screens, is so fine and badly distorted that if you view the screen off axis (not looking perfectly straight down) the images completly vanishes, leaving a black screen. It is only a guess, but I bet the Rollei engineers would have found this unacceptable.
Split image focus spots. To date, I have probably installed (kicking and screeming!) 100+ bright screens with this feature. To my eye, not one of these has perfectly coordinated with the ground image, on the rest of the finder. To this end, I began using my Collimator to check the results, and take my subjective human eye out of the equation, no difference. They leave a dark spot in the middle of the ground area, they never coordinate, and they are just not needed; if you like the one on your 35mm SLR, you will hate the one on your TLR.
So, being a guy who likes ranking things, this is my rating for Fresnel Type bright screens, both manufacturer and aftermarket:
1) Zeiss Ikon's in the Ikoflex. Truly--they got it right. Minimum number of segments, low in distortion, under a nice frosted glass. Bright, and not distorted, clear and easy to focus.
2) Rollei OEM, screens. They don't sit under a ground glass, so they are easily scratched, but they are bright and not distorted.
3) Ricoh products. They are almost as good as the ones above, but are hampered by the fact that they were sold much cheaper.
4) Beatie. These are expensive but they do look good and are easy to get to work right.
5) Rick Oleson. Rick's products are not nearly as good as the products above, but they are priced right and work well. If you demand a bright screen, this is what I recomend. Good quality, at a fair price, and the best service of any manufacturer/seller.
6) Cut down Mamiya RB-67 screens. They look pretty good, but the bright spot, is hard to get coordinated with the mat area.
7) Maxwell. Bringing up the very last, are those screens offered by Bill Maxwell. They are expensive, 300 dollars, are super soft plastic, have way too fine a Fresnel, and distort very badly. Yeah they are bright, and if you like bragging, you can boast about how you have the most expensive screen on the market, but in the end, they are just not worth the money. Also, Maxwell refuses to do business in writing, so you have to endure talking with him on the phone for hours to get the over priced produt he sells...YUCK!
So, in closing, I have used all three of the major makes of "Bright Screens", now in my Rolleiflex 3.5E1, you guessed it, the ground glass that came with the camera. It is ground very finely, is sharp and easy to see when the subject is perfectly in focus. I can clean it with a cotton swab, and not scratch it. The grid is accurate, but dark enough to not obtrusively intrude, into the image, and best off all, it does not cost an arm and a leg.
Not Fresnel Screens that absolutely rule, for focusing a TLR.
Some makers over the years did not use a fresnel screen, but instead used a frosted condenser lens. The first to do so was Zeiss Ikon, in the prewar Ikoflex products. The frosted condensor offers all the advantages of the Fresnel with not one of the problems. They are brigth to the very edge, they are finely etched so you can see the fine details of the image, and they are made of glass so they are durable. Other makers to put these in their cameras are: Early Mamiya TLRs, Kalloflex, the prewar Ikoflex cameras mentioned already, and the Post War Gray and Black Rolleiflex 4x4s. By the way, the post war Rolleiflex 4x4 has the best focus screen ever put in any TLR, bar none. It's too bad you are stuck with a rather hard camera to repair, to get such a good screen.
Let's Talk about Lenses!
I get a lot of requests from customers to make sure the lens is "Good". on cameras they have purchased from the Internet. And I hear a lot of superstitous things on the Internet about lenses. So, let's talk a bit about lenses...
When you first look at lens the thing that most people pick out is the name, like Skopar, or Tessar, Xenar, Planar or Xenotar, or Nikor. What the maker of the lens is telling you in this case is the lens design. With Tessar lenses, they fall into a broad category of lenses know as Cook Triplet lenses. The term triplet in this case means the lens has three groups of lens elements. In the case of a Tessar this is four elements in three groups, one front element, one center and a two cemented elements forming the rear group. Keeping this in mind think of the different lenses to wear the name Tessar. There has to be hundreds, 50mm f:2.8. f:3.5, f:4.5... In a lens, the focal length and the maximum aperture, define the formulation of the lens. A 50mm 2.8 is not just a 3.5 with a larger front element, it is an entire different lens formulation, with not one part interchangeable with the slower lens. This is true also for a change in the focal length, a 50mm f:3.5 has nothing in common with a 75mm f:35--completely different formulation.
The next characteristic for a lens is its field of coverage. I once had an argument with a camera store owner who insisted that the 83mm Anastigmat (Wollensak Veloastigmat) from his Ansco Automatic Reflex would cover 4" x 5". It will cover 2.25" x 2.25" and not a bit more, as it was formulated to cover 2.25" square, not 4x5. There are lenses formulated to be 85mm focal length and cover 4" x 5", such as the Wide Field Ektar. So lenses of a certain design and formulation are made with a certain angel of coverage in mind.
Now let's put those two concepts together, focal lengths/maximum aperture, and angle of coverage. The angle of coverage increases with the f-stop number, or you could say they are directly proportional. So just as depth of field and depth of focus increase so does the maximum angle of coverage when you stop a lens down, to the higher f-numbers. Hence, the appeal to early photographers of the f:64 or even f:128 settings on their lenses. Loads of coverage angle, so they could swing, tilt, rise and shift, and loads of depth of field on a 300mm lens. Now this may seem counter intuitive, but look at it this way, as the rays of light are making their way to the corners of the frame, they travel longer distances than those in the middle, and they may become out of focus. Stopping the lens down increases the depth of focus and in many cases will render the center and corners in equal sharpness. I have had some complaints from customers regarding the sharpness of images they are getting, and they appear sharp in the middle but not at the edges, and I have asked them, what f-number they were at. They stated they always shoot wide open... Some lenses will deliver a good corner to corner sharpness wide open, some will not. Take a look at many of the 50 mm lens designed for 35mm photography. They in many cases do just as advertised, give a good sharp image wide open. Know why? The standard focal length lens for 24mm x 36mm on 135 size film is: 45mm, not 50mm and in the 1950's many manufactures went to the 55mm or 58mm focal length lens, for just this reason, increasing angle of coverage, and therefore getting corner to corner sharpness, at maximum diaphragm opening. In the medium format world, the standard lens for 2.25" square should be a 76mm focal length, most German cameras used 75mm, while most Japanese and SLR cameras used an 80mm focal length lens.
Some time ago, a customer complained that the images he got with is Bronica shot wide open on an 80mm f:2.8 were better than those from his Ikoflex with a 75mm f:3.5 Tessar. I told him the lens on his Ikoflex was not designed to be used wide open, and to shoot it at 5.6 and see what happens. He posted this on the Internet and the hue and outcry was heard round the world. I had said that most Tessars I test look less than sharp wide open. Well everyone on all the forums told me, that they have 300mm lenses on a 4x5 that look tack sharp wide open and I just don't know what I'm talking about. I didn't argue, I just had the moderator take the thread down. The reason, the guy, with the 300 loves it wide open is--300mm designed/formulated to cover 8x10! He is shooting just the center of the circle of coverage and so for sure it looks sharp wide open. To do the equivalent on my customers Ikoflex, you would need the lens to be 152mm in focal length and stopped down to f:8!
The typical Cook Triplet will cover a total angle of approximately 60 degrees. The angle of coverage needed for the 75mm Tessar on the Ikoflex is around 57.5 degrees, so there is little left over and the lens may when wide open, not cover the corners well. To digress from all this theory, and give you a practical measure, I have tested probably 1000+ "Tessar" style lenses, and I have seen perhaps 10 that gave truly top resolving power, and good contrast wide open. The designers expected the photographer would only use the maximum aperture, as a last resort, when there was little light, and they needed an image, regardless of the quality!
Since I have beaten the angle of coverage and aperture to death, now we need to talk about coatings and lens condition. Some time in late 19th or early 20th centuries, photographers began to notice that some lenses had developed a greenish or purplish haze on the surfaces of the elements. These hazes where what is now called age coating. These lenses all of which were quite old, 60, 70, 80, years old or more, were prized by the photographers of the day and sold for thousands of dollars because of their fantastic performance. Well it did not take long for the chemists of the day to figure out what the age coating was, magnesium fluoride(MgF), and for the optical engineers to figure out how to reproduce this coating artificially. There was a down side to all this artificial coating--MgF is food for fungus! So now a problem begins that is still reeking havoc to this vary day. coated lenses grow fungus and can easily be ruined by this fungus. Older designs that were made to work without coatings, can be saved by removing the coatings, polishing them away, and returning some functionality. New designs that incorporate the coatings, are ruined when the coating is lost. There are other problems with coating, if not done well, they can flake, turn hazy or wash away over time.
At this point I do need to digress to mention that not all lens makers used hard coatings. Some like Meopta in the Czech republic soft coated all the lens surfaces except the front of the front element. Leitz only hard coated the two exposed surfaces, the rear of the rear element and the front of the front element; this went on at Leitz well into the 1960s! As a repair tech, when you clean the internal surfaces of a Leica lens, you have to wash them without touching them with anything abrasive, or they are ruined. Zeiss hard coated all optics from the very beginning, but in the end this extra step cost more money, and Leica won in the end--with the cheaper product. It also bears mention that coating can be damaged in a variety of ways, but probably the worst is Sea Water. I have seen a number of lenses that got ocean spray on them, and where the water hit, the coating was removed. So when you got to the beach, put a UV filter on, and don't let sea water get on your valuable lens.
Shoddy Repairs...
In the last few years, I have been seeing many shoddy repairs. These appear to come from several different sources:
1) Actual repair shops that are either ignorant of how to do the work, or are just doing the bare minimum to get the camera out the door.
2) People that watch a YouTube video and try to fix things themselves.
Both of these two, make my work much more difficult and greatly increase the costs of repairs. I will post pictures of this sort of thing in the near future, but suffice to say it is truly sad, what some fine cameras are subjected to, by would be repair sources.
I had a camera that had been sent to a big-name guy(s) three times, for transport work, and when I opened the camera, I found that this repair, was done by dribbling oil right over dirt, and dried grease. So, the L was done, but not the C or A! After I worked on it, I found several worn parts that had to be replaced and now it is still out there taking pictures.
Another guy, (whose name is tossed around a lot on Facebook), did a shutter CLA for a customer, who for health reasons sold me the camera. When I took it apart, I found that the leaves were not cleaned, just flood cleanes, then lubricated, and then he leaves the shutter dirty, and over-lubricated. When I shimmed the lens board, and front cover level, I found that the shutter pin, from the controls , had been ground down to about half its normal length, and did not engage the shutter. So instead of straitening the front cover (It was just a bit bent, like virtually every camera I work on) he did not shim it at all, and ground on a perfectly good part, rendering it useless. I had a used part, so I put it in, and got the camera working correctly, and sold it on to a happy end user. I could not resist sending the ruined part to the guy, pasted onto a card, with the following: WTF, Kr***-- Rolleiflex! He contacted me back via email and would not admit he had worked on the camera! I had an invoice from him, that came with the camera, when I purchased it! Rolleiflex all came from the factory with the parts fitted correctly. As a technician, you may have to shim some of the systems to get them to fit correctly, after all these years.
My prices on Rolleiflex shutters and film transport have gone up, to deal with this sort of thing. I get parts that have plier marks on them, and are bent up out of shape, or filed to the point they don't work any longer. This all adds time to the repair. When Rollei finished a camera and sent it out the door, there were no pats that did not fit. No parts on a Rollei unless broken, in some way, require me, or you to grind them…
(lenses continued from left column)
So far we have discussed lens design, formulation, angle of coverage, and coatings. Now lets talk about a subject that is near and dear to me, lens condition. An old photographer I knew in Portland once told me, a lens need not be perfect to take perfectly good pictures. To this end I once attended a swap meet and across from my table was a guy who was selling his fine art photography, and he had the equipment he was using, on display. All the photographs were made with large format gear, 8x10 and larger. One of the lenses on a camera was a 10 inch f:4.5 Apo-Tessar. This lens had been dropped and the front element was shattered into three big pieces. The owner had super-glued the lens back together, and painted the fractures black with model paint. The images from this lens, were absolutely perfect. No shadows from the paint, tack sharp and very good contrast. How is this possible? Well like my physics professor liked to say: Every point on a lens transmits a complete image. Cover half the surface, all you get is a darker image, not half the image. The Apo-Tessar in the example probably lost 7-10% of the light transmitted, but that was still enough to exposure the film and with such a lens, the loss in sharpness was not even noticeable. So, from time to time I get customers that tell me: "I need a perfect lens, for my photography! If the lens is less than perfect send the camera back, and don't fix it." When I hear this, I think: Well this guy does not know what he is talking about, and is fixated on the wrong things in his photography. If they are a collector that insists on mint condition cameras in their collection, then that is one thing, but as a user, the photographer, needs to know that perfection is costly and unnecessary. Flaws in lenses, create images flaws as a percentage. A few cleaning marks account for such a tiny percent, that they can be ignored.
One of the funny things I see out in the wide world of camera lenses is that Flashlight test for lenses. I see people take out a flash light, or the light on their cell phone, and shine it though the lens of a camera to see if it has separation or fungus or haze or dust. This test will find the issues listed, but what it will not do is tell if a lens is a good photographic performer, or not. I have seen lenses that are separated take good pictures, fungus, haze and dust, just the same. In every case where I have seen the flash-light come out, the customer says: "Look at that haze. You want 300 for that. I'll give you 100." All the flashlight does is drive the price down. If you want a good picture taker, the only way to tell is to shoot it.
The concept of percentage of defect leads me to a very interesting concept in photographic lenses... Fast formulations of designs, seldom perform as well as slow formulations of similar lens designs. Put it more plainly, 2.8 Tessars are never as sharp as 3.5 Tessars, and only in a very few cases have I run across 2.8 Planar/Xenotar lenses that looked as good as 3.5 Planar/Xenotar lenses on Rolleiflex cameras. Small lenses are easier to grind, and the defects in large lenses subtract from the image quality. I consider the Price increase for a 2.8 letter model Rolleiflex versus a 3.5, a complete joke. It mirrors a misconception that price equals quality, and that the 2.8 cameras were the top of the line. What you get for all the extra money, half an f-stop that in most cases is useless. The mantra of buy the fastest lens you think you will need, is flat out wrong. The mantra should be, buy the slowest lens you can possibly shoot, if you need more light, use a flash!
Lastly, I test every lens that comes to me on my National Collimator, and I have developed an educated opinion about each lens design and maker. This opinion of mine, often flies in direct opposition to the common opinion of the masses. I will summarize my years of experience this way:
1) Tessar type lenses (Cook Triplets) are best when used at a maximum aperture of 5.6. Below this number they just flair and loose contrast to the point of not being useful.
2) Uncoated lenses can make excellent images, when the subjects are fore-lit, or when lower contrast is needed or desirable. I would never shoot a coated lens for black and white at night. Never! Also, uncoated lenses can in many cases give better color reproduction, and make more pleasing images on high contrast films such as color positive film.
3) Slower lenses tent to be sharper, and render better images.
4) Damage to a lens, is accumulative, and in most cases minor flaws, like cleaning marks or bad coatings, will still render a fine image. All those flaws do is lower the sale price for the educated photographer.
5) The number of elements has nothing to do with the sharpness of a lens or the image quality it will yield. Nothing at all! I have seen 6 element lenses that are soft, and three element lenses that are tack sharp. It is a matter of how the lens was formulated, what f-stop the lens starts to look soft, and how much it costs to manufacture. Money spent does not always equate to a good image. If you can live with a lens that you shoot at 5.6 and above, then go with a Novar or an Elmar, Tessar, Xenar, or Rikenon, they will make excellent images. If you think you need a 2.8 lens, remember that most will look soft below f:4, so for all that money you spend, you get one f-stop!
I hope this will change some minds about lenses and bring the common knowledge more in line with my knowledge.
My Lubrication Philosophy:
Preface:
I never really thought this would become an issue, but as time has gone by, it has become necessary to put a statement up about my camera lubrication philosophy.
I use only new, modern full synthetic grease and oil. I am not going to tell everyone what they are, but they are of the highest quality I can by. I use three types of grease one very heavy, one medium heavy and one light. I have these greases in 35mm film canisters and doing about 150-200 cameras a year, it takes me about two years use that volume up. For oil I have two oils one is a light weight and one a heavy weight (if they were car oils one would be 10 and the other 90). They are not car oils. I have these in ¼ ounce model paint bottles. It takes me about three years to use them up (typically I spill them before I finish them off).
I have been accused by some people of being an over-lubricator, and as they all like to say: This is fine, until it isn't. I think this began when I mentioned in several invoices that a certain west coast repair shop/persons had been leaving shutters and film transport bone dry. I did not go on the Internet and advertise this, I only mentioned it in passing as what I found when the leather came off, and I did my job. One of my customers did mention this on the Internet and the devotes of that shop/repair persons, made the logical extension that if they were not lubricating, and since I was using lubrication, I must therefore be over lubricating. Any Lube Became Over-Lube!
Theory:
Before I begin I need to discuss why lubricants are used, the theory of lubricants and the three types of lubricants used in camera repair. There is by the way, a sub-set of Mechanical Engineering devoted to the study of lubrication, it is called Tribology, and this science has advanced greatly since most of the cameras I work on were made, and along with the chemically engineered lubricants now available, we can make, from a lubrication stand point, the camera better than new.
In a mechanical device, where motion is transmitted, two materials will pass each other in opposite directions. Gear teeth will slide past one another sliding in opposing directions, and this will transmit the motion, while reversing its rotational direction. If we look very closely at the materials that are being used, say under a scanning electron microscope, the surfaces we see as smooth, are anything but smooth. There are huge valleys and craters on the surface. Those imperfections will create friction, and friction will induce an energy loss through the transmission. My father a mechanical engineer would quote that there was a 9% loss in energy each time you went though a gear. He died in 1995 and in the ensuing years it has been dropped to around 5%.
Sounds like there is progress in the world of material and manufacturing science. Why we use lubricants is to fill in the those microscopic hills and valleys, so that when the two materials pass in opposite directions, the don't actually touch each other and induce friction, or wear, they ride on a film of the chosen lubricant. The optimal situation is that the lubricant takes the motion, and transmits it with no friction at all. In reality this is not possible, so there is still friction, but the friction is reduced significantly, and there is little energy loss from friction. Choosing the right lubricant for our applications can be tricky, but since I have been doing this since 1996, I have taken the guess work out, with years of careful study, and consulting, with engineers (friends of mine). So over the years I have acquired three types of lubricants, Dry Lubricant, Oil, and Grease.
Lubrication Philosophy Spelled Out:
For flat sheets of metal that pass by each other, and have to move fast, like on a shutter leaf drive ring, I use a dry lubricant. On parts that have a to move fast but have a light load, I use light oil. On parts that have to move fast but have a high load, I use heavy oil. For parts that have a very high load, and need to move fast, I use light grease. For parts that do not need to move fast but have a high load, I use heavy grease. Situations like the shafts on the ends of escapement gears, get oil, drive nose for shutters get light grease (just like it says in the factory manual), and things like the crank on the side of Rolleiflex they get medium grease. The wind lock on a Contax gets heavy grease. This is how I do it. Plain and simple logic dictates my use of lubricants and the amount I use. Tiny amounts, applied to the wear surface(s) only.
From time to time I use lubricants in a different way, to protect metal from rust/oxide, for this purpose I have dissolved a small amount of light oil in a solvent, and I dip the parts to give them an even coating. I do this to preserve the parts for the future. You will see in my invoices, this phrase: There was some corrosion on the parts, so I cleaned the oxide away, and coated the parts in a light film of oil, to preserve them. I tell my customers what I do…
What Damage Over Lubrication causes?
Each and every day, I work on shutters that have oil on the blades. This is a universal problem in old leaf shutters. The makers called for oil and grease in the repair manuals and they got/get those lubricants. When this oil migrates what harm does it cause? Well, the oil dries out, and the shutter leaves stop moving. If you just leave it alone and send it in, there is no harm done at all. If forced then there can be damage to the leaves, the main spring will simply not apply enough force to damage the leaves. I clean the shutter and leaves, lube it, and adjust it, and it will work for the next 15-20 years. I had the phrase said to me, from one of the “devotes”, on Facebook: You dangerously over-lubricate, and we all know that can cause real harm to a camera.” Well, I spend 8 hours a day, seven days a week working on old cameras, and I don’t know that over-lubrication causes real harm. I have seen cameras with perhaps 50-100 times the amount of lube in the shutters, than I use, and I had no trouble making them work. From where I sit, if it spreads to the leaves in 15 years, not 20 was it over-lubricated? Ten years? What is the harm, other than you spending more money to get your camera up and running? As far as the real harm, I reverse the effects of over lubrication every day—no real harm is caused, parts coated in oil are preserved! As I stated, I have cameras 20 years out still working, and no migration of oil to the leaves, so I am not an over lubricator…
Under Lubrication, or Running without Lubrication:
I also encounter the opposite of Over-Lubrication, that of Under-Lubrication. I suppose there is a perfect amount of lubrication, applied to a part, This amount would protect the part from wear, but be so slight it would not be sufficient to migrate and cause problems. This amount is not clear, and varies from technician to technician, what is perfectly clear is that not having lubricants will create real harm. If a cameras moving parts were left completely dry, then there would be metal on metal contact, and those parts will wear, and wear out. I see Rolleiflex camera that have had the transport flood cleaned, and left dry on a regular basis. I have seen this from some of the most highly regarded technicians working today. It is done when people working with cameras get rushed, behind, or just need to get some fast income. Under Lubrication Ruins cameras. There is only one way to work on an old classic camera, and this is to remove the parts, clean them, lubricate them and then adjust them. So, when you hear a person say, Oh, that guy is an over lubricator, avoid them. You should hear: "Well, he may shorten the service of the camera before it needs a CLA, but at least he isn't setting my camera up to wear out." Prontor shutters were shipped bone dry, with out any lubrication at all. On a repair forum I sometimes visit, a hobbiest had gotten a repair manual for a prontor shutter and quoted that they are to be serviced withut lubrication. Myself and several other professionals chimed in that they really need to be lubricated. He told us we were not doing the repairs according to the manual. My responce was, that the manual was written in 1950-something and that parts were available then. They are no longer available! Lubrication is needed to perserve the wear parts, prevent corrosion, and to extend the life of the shutter. Today, when most cameras I work on are 60+ years old, lubrication is an absolute necessity.
In Closing:
My main goal in my chosen profession is it get your old camera to work again, and work for the next 70+ years. I do this with my high level of skill (now my hats won't fit) and by application of correct amounts of lubricants, of the correct type, to the wear surfaces of the parts. It is just that simple. Be very leery of anyone that tells you, their CLA will last longer, because they put the parts back together dry! Your use of your camera, will ruin it!
Focal Plane Shutter Theory, and Flash Synch
Let’s talk about shutter speeds on a focal plane shutter cameras. On a focal plane shutter camera, the top speed at which the camera is strobe/flash synchronized is twice as long it takes the first curtain to travel the film gate. So with a Contax the top speed is 1/50 of a second, so it takes the first curtain 1/100sec to travel the film gate, then the flash goes off, then the second curtain takes 1/100 sec to travel the film gate, 2/100 is 1/50. So, people will often incorrectly assume that setting the camera to speeds between 1/100 to 1/1250 will give them the ability to stop action; but this is just not true, as the curtain takes 1/50th of a second to clear the film gate. The difference in exposure is the fact that the open slit created by the two curtains is not the full width of the film gate. If we apply the flash speed logic to the width of the curtain slit, we get with a Contax: 1/50 is a one inch wide slit, the full film gate; 1/100 is 1/2 inch; 1/250 is 1/5 of an inch or 0.2 inches; 1/500 is 1/10 of an inch or 0.1 inches; and 1/1250 is 1/25 of an inch, or .040, which is a very small slit indeed. Just the slightest bit of girt, or migrated lubricant will change the slit width and change the timing very dramatically. Further, as the cameras age there is wear on the busings that can easily make this tiny slit double it's width, or worse yet not "uncap" at all. Even things like tipping the camera to take a vertical composition will create problems. Years ago, the owner of Hollywood Camera Store, in Portland Oregon, Ed Shoenecker, said of the 1/1250 speed: Those were iffy when we sold those cameras new... This also goes for the width of the curtain silt on a Leica, for the 1/1000 speed. The slightest bit of wear, or the curtains not adjusted perfectly, and no slit or a speed of 1/500. So, if you are purchasing a 60+ year old camera for the fastest speed, you may want to reconsider, and get a new camera; as the highest speeds are just not getting more accurate with age.
On slower speeds that 1/50th the second curtain is held up and does not start on its way until the perscribed time has been achieved. This is why often when a camera is in need of repair, it will hang open on the slow speeds but still be fine on the high speeds. As an owner/user you can determine the split between the high and low speeds by listening to the shutter run off. if the shutter makes a whiring, or zipping sound, like when it is on 1 second, then this is indicating the slow speed escapement is engaged. No whir, or zip, you are on the high speeds. On a Contax the split is at 1/25 is on the slow speeds and 1/50 is a high speed. On a screw mount Leica the 1-25 are slow speeds and all above are high speeds.
I hope everyone finds this useful...
Making 120 into 620 and 127
Over the years I have had many people want to know how I make my own 620 and 127 size roll film, so here are the directions (620 is very simple, 127 not so simple).
120 Into 620: Start with a new roll of 120 film and one each 120 and 620 empty spool. In your darkroom or inside a changing bag, roll the fresh 120 onto the empty 120 spool, taking care to keep the film in register to the backing paper. Keep pulling the paper backing tight as you go, and try to avoid handling the film with your fingers; I like to use powder free nitrile gloves. Once the film is on the 120 spool as though it had just been shot, work it back onto the empty 620 spool. When you come to the point where the film starts, pull the paper backing tight (on the 620 spool) and begin spooling film and backing onto the 620 spool. Once again try to keep the paper and film in proper register as you go. When you get to where the film is taped to the paper backing, remove the film form the backing, by carefully untaping it. Make every effort at this point to not tear the backing paper, film or tape--so go slow.
Now allow the film to spool around the backing and pull just the paper backing tight and lay it over the tape which holds the film in place. Continue to spool the paper backing until done, and tape with artist tape.
This operation takes me less than two minutes and in time you will get very fast as well.
Slitting 120 into 127:
This is more involved than the 620, 120 metamorphosis, so here is a list of the things you will need:
1) Paper cutter, either guillotine or rotary, however the rotary will have to be 32 inches in length minimum.
2) Two used 127 spools, preferably Kodak, as they fit the cameras the best.
3) Masking tape.
4) Scissors,
5) Artist tape 1/2 inch wide
6) Clear plastic packing tape (non-filament)
Take the used 127 backing and where the film was taped (remove any old masking tape) place a piece of packing tape, on the black side, centering it on the place where the tape for the old film was. This will allow you to use the backing paper many times without the film tape damaging it.
Now tape the 127 backing to a wall or counter in your light tight work area. I use the masking tape for this, after I have run the adhesive side over my pants leg, to reduce the tape hold. Make sure you put the start end up if taping to a wall. If on a counter, make sure, you make a mental note of which end is the start.
Set up your paper cutter so the fence is the exact width of 127 film. I used an old roll that came in a camera I purchased. Make sure it is straight and that it fits snuggly against the cutting surface so that the film cannot slip under the fence.
Now with the lights off, unspool the roll of 120 and separate it form the backing paper, as carefully as possible. You do not want the paper to stick to the tape and ruin it. Allow the roll of film to roll up naturally and put the backing side down (emulsion up) against the cutter table and the left edge against the fence. Slice the film as far as the cutter will allow (all the way with the rotary cutter), or about a third of the way with a 12 inch guillotine cutter. Be very careful with the cutter and, go slowly so you do not cut your fingers. With the guillotine cutter move the film up and allow the 127 to roll up on itself. Repeat the above cutting operation until you are done.
Now take the 127 size strip over to the backing and unroll it so the sticky side of the tape faces the backing (emulsion out). Feel for the packing tape and place the tape (on the film) near the middle of the packing tape and stick it down with only one finger in the middle. Alignment is critical at this step so make sure the film is even with the backings edges and going as straight down the backing as possible. Sticking the film with only one fingers allow you to adjust it more easily, and for the film to self correct as it is rolled. Feel to where the film ended on the used backing and cut the new film to length (trust me you can feel it) Remove the paper backing form the door or horizontal surface and roll it forward onto an empty 127 spool. Try to keep minimum tension as the film first goes on, as this will allow the film to center on the spool.
Once on the 127 spool roll it back onto the second 127 spool and make sure to keep it in register with the backing. If it does happen to get out of register, remove the tape as in 120-620 above. make sure you pull it nice and tight and that all the slack is out of the entire roll as you go.
Put a small strip of artist tape onto the roll to hold it until used. I like to keep some small rubber bands in my bag to hold the film on the spool once shot, and the tape in this step can be replaced with a rubber band.
If you were using an automat camera such as a Baby Rolleiflex, you could slit the 120 film and backing at the same time, and simply cut the film and paper backing to length. This however is not possible with red window film advance cameras, or with those that require you to align arrows for the start of the film.
I hope that these directions will help you to use and enjoy your vintage 127, and 620 cameras more.
Ikoflex Focus Improvement--Teflon Pads!
I have been buying, selling and repairing Ikoflex cameras for some time, and have never been happy with the results of the focus CLA. They would always be stiff, no matter what I tried. The culprit turns out to be the focus helix pads, which are made of leather and backed with steel. These pads soak up the oil in the grease and squeegee what remains away, leaving the focus stiff. My long sought fix Teflon pads. I cut them to fit, and with some grease they are super smooth, and restore the feel to that of a new camera. I was doing ball berings but they turned out to be too costly, and they would impress a groove in the focus hellicoid, that caused the focus to loosen over time. So now it is teflon all the way. This is a free of charge upgrade when I work on the focus, of your camera.
After-market Bright Screens:
I get a lot of requests for installation of aftermarket bright screens, in TLR cameras. The only ones I can whole heartedly recommend are the screens made by the camera manufacturer in the first place. Or to put it more straightforward, I don't like any aftermarket screens of any type.
All of the aftermarket screens are soft plastic that scratch's easily, and so will lack longevity. I like to use the focus aid on my cameras, so what I see with a Fresnel screen is a bunch of grooves, which make focusing harder than the original darkness problem ever did. Some screens like those made and sold by Bill Maxwell, have the Fresnel soo fine, that when you look at it off axis, large portions of the screen turn dark, forcing you to change your angle of view. I have never seen the value in the Maxwell products, and this one fact alone is enough to drive me NOS screens from the major auction site.
So, I will happily install a bright screen, you provide with your camera, but I don't carry them, and have no intention of doing so in the future. Oh, if I am doing a CLA of your camera, I will install the bright screen for free. All others expect to pay me 30-45 dollars for the install.
Also, I now work with Rick Oleson and provide both the split screen and the bright screen, he manufactures. They are a reasonable screen at either 50-80 dollars, depending on the model. If I were to rank Fresnel type bright screens from best to worst, it would go thusly:
1) Zeiss Ikon Ikoflex. They are really great, but as they are smaller than the actual 2.25" x 2.25" the only camera they will work with is, and Ikoflex.
2) Rolleiflex factory screens either the one for the F, T, 'cord Vb. They are a very good screen indeed.
3) Ricoh, as put in the Diacord. Oh, the Yashica screens are good too, but not as good as a Ricoh. My friend Karl Brian says the Minolta Autocord is as good as Ricoh too, but I have no experience in this regard.
4) Mamiya RB 67 Screens. They can be cut down, to work in a Rollei product. I like them, but the micro prism is a bit hard to get in coordination with the area around it.
5) Beatie. The best of the aftermarket screens, however it is costly.
6) Rick Oleson. His products are good quality, and they are down in the rankings, but the price gives them high bang for the buck, so they are the ones I install most.
7) Kodak. Yes Kodak put them in the Reflex and Reflex II...
8) In the ultimate position, it is the Maxwell. The above listed problem, coupled with a very high cost, and his slow and sometimes, non service to paying custommers, make this the least desireable opinion.
Why I no longer sell Parts!
For some time I have sold parts for cameras to people that figured they had the ability to put the parts in their own cameras. This was never much business and I never made profit from it, when I considered my time to pack it and ship the parts. Well in the last few years I have begun to run out of parts for some of the failure prone systmes on the cameras I work on. So, now I don't have the parts to fix cameras, that are sent to me, costing me a great deal of time. So, considering I never know what I might need, I just can't spare the parts any longer. Sorry, pay me to install it, and I'll sell it to you (many times I throw the parts in on a large labor bill), otherwise, don't bother contacting me.
New 127 Film!
Fotokemica has now discontinuted all film porduction, and has left a large and very much missed void in the 127 film market. There are several film products avail from The Frugal Photographer. com, in both Black and White, and Color Print. They are more money but we can at least still use our cameras. Once I have used these productgs I will give an update of my results. There is also a new brand called Rera Pan, made in Japan by Kawauso-Shoten. I have used this film, and it is a good quality fine grain 100 speed black and white. I would recommend however that you respool it on to old steel spools and the plastic sprocket is rather weak.
Post War Gray/Black Baby Rolleiflex
In the past I have flat out refused to work on this model of camera, as they are very different (read frustrating) to work on, and I was having trouble making them work reliably. I have spent the better part of the last three years, tinkering with them in my free time, and can now offer repairs to his model.
Here is what makes this line of cameras so frustrating to work on. On all previous Rolleiflex cameras with the Automat film transport, as you crank, and advnace the film the shutter is tensioned, and the exposure spaced. When the trigger is depressed, there are two things that happen, the shutter is released to complete its cycle, and the film transport is released to wind to the next exposure. The User can if the transport is not released, push the trigger down a second time, to release it, no harm, as the shutter is not under tension any longer. With the Post War Rolleiflex 44, this is not the case. When the user turns the advance knob, two things happen, the film is advanced, the exposure is spaced, and the shutter is tensioned, just like the 6x6 camera. When the trigger is depressed, it fires the shutter, and then when the shutter finishes it cycle, the film transport is released. The shutter releases the trasnport, not the user. So, the shutter is working properly then all is well, but if not, then the shutter can make the camera show signs of a transport issue, or the transpor not working right, will make the shutter act up. The permutations can go on and on... I get paid well for these and as far as I can tell, I am the only tech working on this line of camera.
When working right, and this is a big caveat, this camera really takes a back seat to no other 127 camera! They are flat out awesome performers that will make excellent images, in both black and white and color, and use readily available and inexpensive Bay I accessory. The Autostop film transport is a real joy to use, and so is the auto-shutter cocking, they are good quick users with good lenses, light, and are handy to use. How could you ask for more. Keep in mind they are 250-500 dollar